Xmplify Frequently Asked Questions
-
The short answer is, you don't need to do anything. Xmplify has extensive support for auto-completion using your document's Document Type Definition (DTD) or XML Schema (XSD) - and if your document doesn't specify a DTD or XSD, Xmplify will automatically derive an XSD for your document as you edit it in order to be able to provide intelligent auto-completion support.
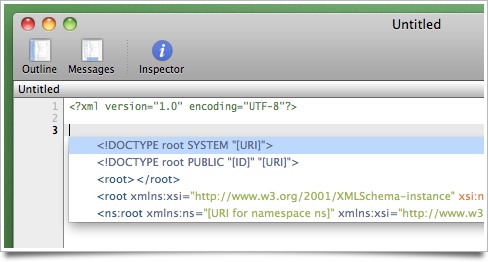
Xmplify will automatically suggest auto-completions when you use the Insert menu commands or their associated keyboard shortcuts to insert document nodes (elements, attributes, namespaces, etc). Selecting Insert | Using Completion Templates, or hitting its keyboard shortcut ⎋ (Escape) will suggest all known valid auto-completions for the current insertion point. For example, hitting ⎋ in an empty document gives the following auto-completion suggestions:
If there are no valid auto-completions for the current insertion point, Xmplify will beep. If there is exactly one valid completion, Xmplify will automatically insert it for you.
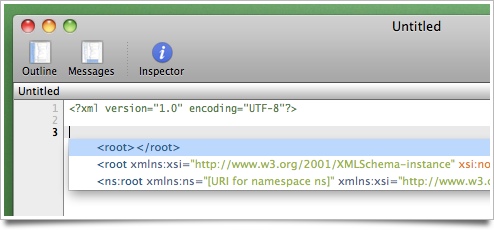
The other items on this menu will also suggest all known auto-completions for the current insertion point, but will only show auto-completions of the type allowed by that menu item (ie, elements, attributes, etc). For example, hitting ⌘< (Insert | Element) in the same location in an empty document gives the following auto-completion suggestions:
-
Xmplify's auto-complete uses the DTD or XSD specified by your document; or, in the absence of both a DTD and an XSD, auto-generates an XSD for your document. (See How do I get auto-completion working? for more details.)
Thus, to auto-complete XSLT tags you just need to make sure your XSLT specifies an XSLT DTD or XSD. The W3C has published an "unofficial" DTD for XSLT v1; you can use this DTD by adding the following DOCTYPE declaration to the top of your XSLT document:
<!DOCTYPE xsl:stylesheet
PUBLIC "Unofficial XSLT 1.0 DTD"
"http://www.w3.org/1999/11/xslt10.dtd">
Note that to use this DOCTYPE declaration you will need to ensure you declare an "xsl" namespace on your root xsl:stylesheet element. (This is necessary for your XSLT to be correctly processed by most XSLT processors, anyway.) For example:
<?xml version="1.0" encoding="UTF-8"?>
<!DOCTYPE xsl:stylesheet
PUBLIC "Unofficial XSLT 1.0 DTD"
"http://www.w3.org/1999/11/xslt10.dtd">
<xsl:stylesheet xmlns:xsl="http://www.w3.org/1999/XSL/Transform" version="1.0">
</xsl:stylesheet>
Xmplify provides the "XML Stylesheet (XSLT)" document template to simplify the process of creating an XML document that uses an external DTD. This template is available from the File | New From Template menu.
For more details on how to specify a DTD, see How do I specify an external DTD for an XML document?.
-
To specify an XSD that declares a target namespace, the root element of your XML document should use the following format:
<?xml version="1.0" encoding="UTF-8"?>
<root xmlns="http://example.com/namespace"
xmlns:xsi="http://www.w3.org/2001/XMLSchema-instance"
xsi:schemaLocation="http://example.com/namespace
http://example.com/schema.xsd">
</root>
Make sure that the namespace declared in the xmlns attribute matches the namespace specified in the xsi:schemaLocation attribute, and that your Mac can access the URI you specify for the XSD (in the second part of the xsi:schemaLocation attribute). Xmplify will automatically use your Mac's network settings, including any proxy settings, to download the XSD from this URI.
Note also that the name of your root element must match one of the global elements declared in your XSD.
For example, the following XML document snippet specifies the COLLADA XSD as its schema:
<?xml version="1.0" encoding="UTF-8"?>
<COLLADA xmlns="http://www.collada.org/2005/11/COLLADASchema"
xmlns:xsi="http://www.w3.org/2001/XMLSchema-instance"
xsi:schemaLocation="http://www.collada.org/2005/11/COLLADASchema
http://www.khronos.org/files/collada_schema_1_4">
</COLLADA>
To specify an XSD that doesn't declare a target namespace, the format is a little simpler:
<?xml version="1.0" encoding="UTF-8"?>
<root xmlns:xsi="http://www.w3.org/2001/XMLSchema-instance"
xsi:noNamespaceSchemaLocation="http://example.com/schema.xsd">
</root>
Xmplify provides the "XML Document with XSD" document template to simplify the process of creating an XML document that uses an XSD. This template is available from the File | New From Template menu.
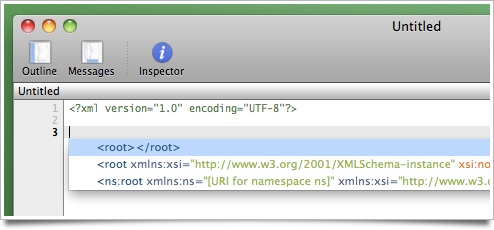
Xmplify will also offer suitable auto-completions for a document that doesn't yet have a root element (and for which no DTD has been specified):
-
To specify an external DTD that is used in a single application, use a DOCTYPE declaration with a system DTD identifier:
<!DOCTYPE name SYSTEM "URI">
If you're using a DTD that spans multiple applications, use a DOCTYPE declaration with a public DTD identifier:
<!DOCTYPE name PUBLIC "Public ID" "URI">
If you're not sure which category the DTD you're using falls into, use a SYSTEM DOCTYPE declaration. In either case, make sure that your Mac can access the URI you specify for the DTD. Xmplify will automatically use your Mac's network settings, including any proxy settings, to download the DTD from this URI.
For example, the following document refers to the DTD that defines the Apple Property List document format, which is used by many applications on OS X (including Xmplify and OS X itself) for storing configuration settings:
<?xml version="1.0" encoding="UTF-8"?>
<!DOCTYPE plist
PUBLIC "-//Apple//DTD PLIST 1.0//EN"
"http://www.apple.com/DTDs/PropertyList-1.0.dtd">
<plist version="1.0">
</plist>
Xmplify provides the "XML Document with External DTD" document template to simplify the process of creating an XML document that uses an external DTD. This template is available from the File | New From Template menu.
-
To specify an internal DTD - that is, one that is entirely defined within your XML document itself - use the format:
<!DOCTYPE name [declarations]>
For example, the following document includes a trivially simple DTD that specifies that the root element of the document be named "root" and that it must contain parsed character data (text), only:
<?xml version="1.0" encoding="UTF-8"?>
<!DOCTYPE root [
<!ELEMENT root (#PCDATA)>
]>
<root>This is a text node...</root>
Xmplify provides the "XML Document with Internal DTD" document template to simplify the process of creating an XML document that uses an internal DTD. This template is available from the File | New From Template menu.
-
Xmplify automatically validates XML documents against their XSD or DTD (if they have one), reporting back details of any issues it finds in the Messages panel. You can show or hide the Messages panel using View | Messages (⇧⌘M), by clicking the Messages button on the document's toolbar, or by clicking on the header of the Messages panel itself.
Hit ⌘= and ⌘- to cycle forwards and backwards through the current set of document errors.
Xmplify will also show the number of issues in the status bar with an icon that indicates if errors were found, or just warnings. If no icon is showing it means your document successfully validates.
Every time you edit your document Xmplify will automatically re-validate it, so you never need to explicitly request re-validation.
-
To derive an XSD for the current document, or to see the XSD Xmplify has automatically derived for it, choose Tools | Derive Schema for Current Document - or hit its keyboard shortcut, ⇧⌘D.
-
If you have multiple XML documents that you'd like Xmplify to analyse and derive a single, encompassing XSD for, choose Tools | Derive Schema for Multiple Documents, or hit its keyboard shortcut, ⌥⇧⌘D.
-
Add your own custom document templates to ~/Library/Application Support/Xmplify/Templates and the next time you start Xmplify they will be available from the File | New from Template menu.
You can also add any templates you want to be available to all Xmplify users on your Mac to /Library/Application Support/Xmplify/Templates.
Xmplify will create nested submenus for each directory it finds inside these locations, so you can keep things tidy even if you have a lot of custom templates.
-
When a template is selected from the File | New From Template menu, Xmplify searches first through the user's templates, then the system-wide templates, and then finally through the built-in ones for a match, so if you create a template with the same name as one of the built-in ones and put it in your user templates directory (~/Library/Application Support/Xmplify/Templates) your custom template will be used instead of the built-in one.
Xmplify runs natively on both Intel and Apple Silicon Macs and requires macOS 10.13 High Sierra or above


